Learn how to make your own custom graphic T-Shirt using a Basic Image Editing Program, an Inkjet Printer, Transfer Paper and a White T-Shirt!
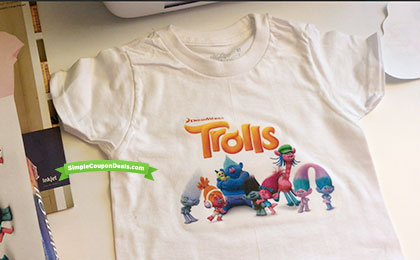
Hi there! If you follow me on Instagram @SimpleCouponDeals, you may have seen my kids wear this adorable DreamWorks Trolls T-Shirt! Thanks to the movie that came out last year, my son is in love with Trolls! I could not find a shirt suitable for him – most of the shirts I found were pink or purple –made for girls!
After searching far and near, I decided to make my own T-shirt. It’s actually quite simple. I thought I would share it with you here. I hope you enjoy my very first How To Tutorial! Let me know what you think of it in the comments.
Follow me on Instagram and subscribe to our new channel at YouTube!
To make your own custom T-Shirt, you will need 7 things:
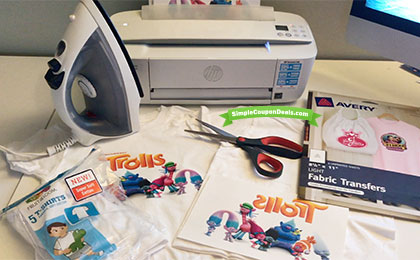
- Image editing program to make your artwork. I used Adobe Illustrator – an advanced graphic editing program. You can get a similar and more basic graphic program for free. I recommend Gravit or Vectr – these apps are FREE!
- White T-shirt – I got a 5-pack Fruit of the Loom T-shirts from Amazon for under $8!
- Ink Jet Printer – My go-to printer is the HP DeskJet 3755 – it’s compact and wireless and under $60.
- Fabric Transfers Paper – The brand I used is Avery. You can get a 18-sheet pack here.
- Scissors – Any sharp pair of scissors will work
- Iron – Your household iron will do just fine. Make sure you have absolutely NO Water in the iron
- Hard Flat Surface to work on (preferably a wood table)
I was able to make 5 shirts for my son for the price of the shirts and fabric transfers: $23.88! Approximately $4.77 per shirt! Plus, I had extra Transfer Paper to use for my daughter and my baby son! Depending on what materials you have around the house, your cost may vary just slightly.
Here is how to make your own Graphic T-shirt
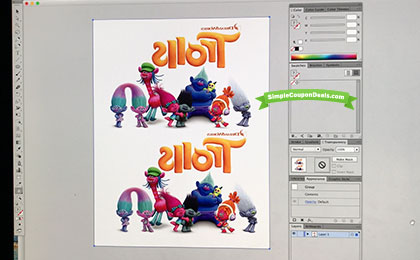
- Step 1 – Create Your Graphic
- Using your image editor, take any photo and flip it horizontally. When you transfer the art to your shirt, it will be reversed, so your letters will look backwards, but they will transfer onto the fabric and read normally.
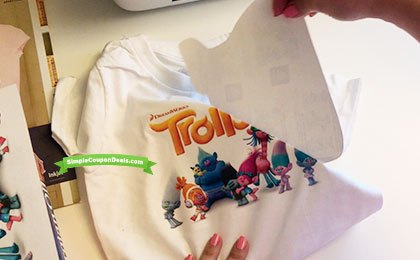
- Lucky for you, I found this awesome DreamWorks Troll graphic on the DreamWorks Trolls website and reversed it, duplicated it and saved it as a PDF File for you to use!
- Click here to download the Free DreamWorks Troll Graphic. Note, I do not own the copyrights to this image and this is for non-commercial, personal use only.
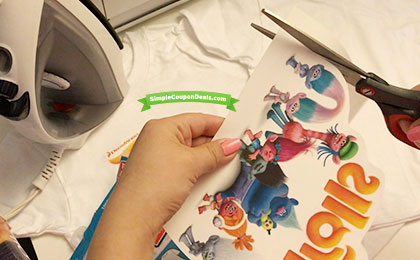
- Step 2 – Print Your Graphic
- Using an Inkjet printer, print your artwork onto the sheet of Fabric Paper. Run the paper “side up” facing your ink cartridge. If you’re not sure, you can test on a blank sheet of paper to see how to run your paper thru
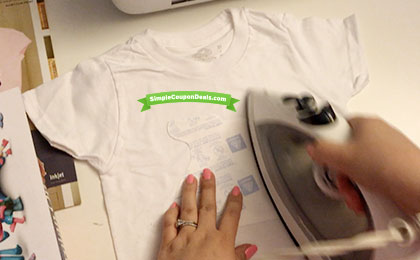
- Step 3 – Turn on your Iron & Cut Your Graphic. Do not add water. You do not need or want any steam. This will ruin your fabric paper! While your Iron is heating up, cut out your artwork leaving half an inch around the edges
-
- Step 4 – Smooth Out Your T-Shirt and Place Your Graphic Transfer side down. Lay your cut out artwork flat on top of the shirt where you want it to be
- Step 5 – Iron on Your Transfer. Using lots of pressure, iron over the artwork onto your shirt, start from either left or right side and move in an up and down motion until your reach the opposite side. Do this 3 or 4 times for good measure. Rest for 1 minute to allow your shirt to cool off.
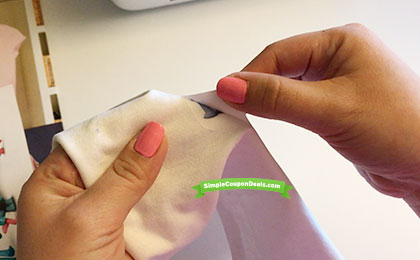
- Step 6 – Peel the Transfer Off Your Shirt. Gently peel from the bottom left side up to the right, making sure you do not stop in between otherwise you will leave marks on the artwork
- Step 7 – Happy Dance! Pat yourself on the back and wear your shirt!
Let me know what you think about the tutorial by leaving a comment! I love reading your comments and suggestions.
Follow me on Instagram and subscribe to our new channel at YouTube!